Oct 27, 2025
You want to build the perfect leads list on LinkedIn Sales Navigator?
But you don’t know how to do it properly?

In this guide, I'll show you how to:
Define your ideal customer
Find your leads with Sales Navigator
Save and organize your leads lists properly
Export your list and plug it into your CRM
🎥 You prefer to watch a video? Here is the link:
How to Build Your Lead List On LinkedIn Sales Navigator
Before building a list, you need to know who you're targeting and how to find them. Here's how to do it:
How to Define Your Ideal Customer
Your lead list is only as good as your targeting. That’s why you need a clear ICP (Ideal Customer Profile).
And defining your ICP happens in two steps:
Step 1: Choose the type of company you want to target
Ask yourself:
What industry are they in? (e.g. SaaS, Real Estate, E-commerce)
How big are these companies? (e.g. 1-10, 11-50, 51-200 employees)
Where are they located? (Country, city, region)
What’s their business model? (B2B or B2C)
Who are the decision makers
Step 2: Identify the right person inside that company
This is where you define your buyer persona. You want to find the people who actually make decisions.
Look at:
Job title (e.g. Marketing Manager, CEO, Head of Sales)
Seniority level (e.g. Owner, Partner, Director)
Department (e.g. Marketing, Sales, Operations)
Years of experience or past companies
This 2-step ICP will help you find high-quality leads, not just random profiles.
At the end, you should have something like this table, with company info and buyer persona info:
Company Info | Buyer Persona Info |
|---|---|
SaaS | Head of Marketing |
11–50 employees | Director level |
France | Marketing Department |
B2B | 5+ years experience |
How to Use the Lead Filters
Once your ICP is clear, open Sales Navigator and head to the "Lead filters" section.

Then, you will find all the filters from Sales Navigator.
For example, you can filter your leads by:
Company size
Current Job Title
Years of experience
Post on LinkedIn
Geography
Viewed your profile recently (very useful to find warm leads)
Industry
Keywords
Past company
Connections (useful to export your connections on LinkedIn)
Etc

This helps you source exactly who you want to reach.
How to Save Your Leads List
Once you’ve filtered your search with some filters, it's time to save your leads list.
You can save specific leads in a list by clicking on the box next to the lead:

Or you can click on "Select all" to select the 25 leads of the page:

Then, you click on "Save to list", "Create new list":

To create a lead list, choose a List name, list description and click on "Create and save":

If you want to add leads in the list, you just need to select the leads and select your list.
You will have the number of leads in it.

You have to go on the next page to add the next 25 leads.
Unfortunately, you have to repeat this process page by page :/
How to Organize Your Leads Lists
You can see your leads lists by clicking on "Leads":

On this page, you have all the informations about your leads lists, such as:
Name of your lists
Number of leads in it
Last time updated
You can sort your lead lists them by name, and last time updated.

On more thing you can do is to check all your saved leads by clicking on "All saved leads".
That's not the most useful features, but at least, you know it exists.

How to Manage A Lead List
If you want to see what's inside a list, you just have to click on the list.
For this example, I want to check "CEO - Profile viewers".

Once you're on the page, you have a access to informations like:
"Total results"(meaning the number of leads in your list)
"Changed jobs in past 90 days" (meaning they are most likely open to new services/tools)
"Posted on LinkedIn in past 30 days" (meaning these leads are active on LinkedIn)

For each lead, you have informations like:
Name
Account
Geography
Notes
Outreach activity
Date added
Actions

Of course, you can delete a lead if you think it's not relevant.
How to Delete a Lead List
If you want to delete a lead list, you just have to click on the 3 dots, and click on "Delete".

Best Practices for Managing Your Lead Lists
Save Your Lead Search
I’m sure you don’t want to redo your filters every time? That’s why you need to save your search (which is different from save a lead).
When you're on the lead search with all your filters, click on “Save Search to get notified of new results".

You can manage your saved searches by clicking on "Manage saved searches".

Tip: Give your saved search a clear name and description like "SaaS CEOs - France - 11-50 employees"
🎥 If you want to watch the video tutorial on how to save your search on LinkedIn Sales Navigator, you can check this video:
Update Your Filters
Your ideal customer may change. So should your filters.
Every 1-2 months:
Review your ICP
Adjust your Sales Navigator filters accordingly
Remove filters that no longer make sense
How to Export Your Leads List
Now it's time to export your list to either upload your leads in:
Your CRM
Favorite outreach tool
For that, you need to use a LinkedIn scraper tool like GiveMeLeads.
How to Export your Leads List in Sales Navigator
Follow the 5 steps to export your leads from LinkedIn Sales Navigator with their verified emails:
Create a GiveMeLeads account
Download the Chrome Extension
Select your target on LinkedIn Sales Navigator
Launch your export
Download your leads file
Let's dive in!

Step 1: Create a GiveMeLeads account
Go on GiveMeLeads. Then click on "Get first 10 leads for free".
Then, you have to write your:
First Name
Last Name
Email
Password
And click on "Create account".

Step 2: Download the Chrome Extension
To get started, install the GiveMeLeads Chrome extension from the Chrome Web Store.
Once installed, it integrates directly into LinkedIn Sales Navigator, allowing you to extract your leads instantly while browsing your search results or saved lead lists.

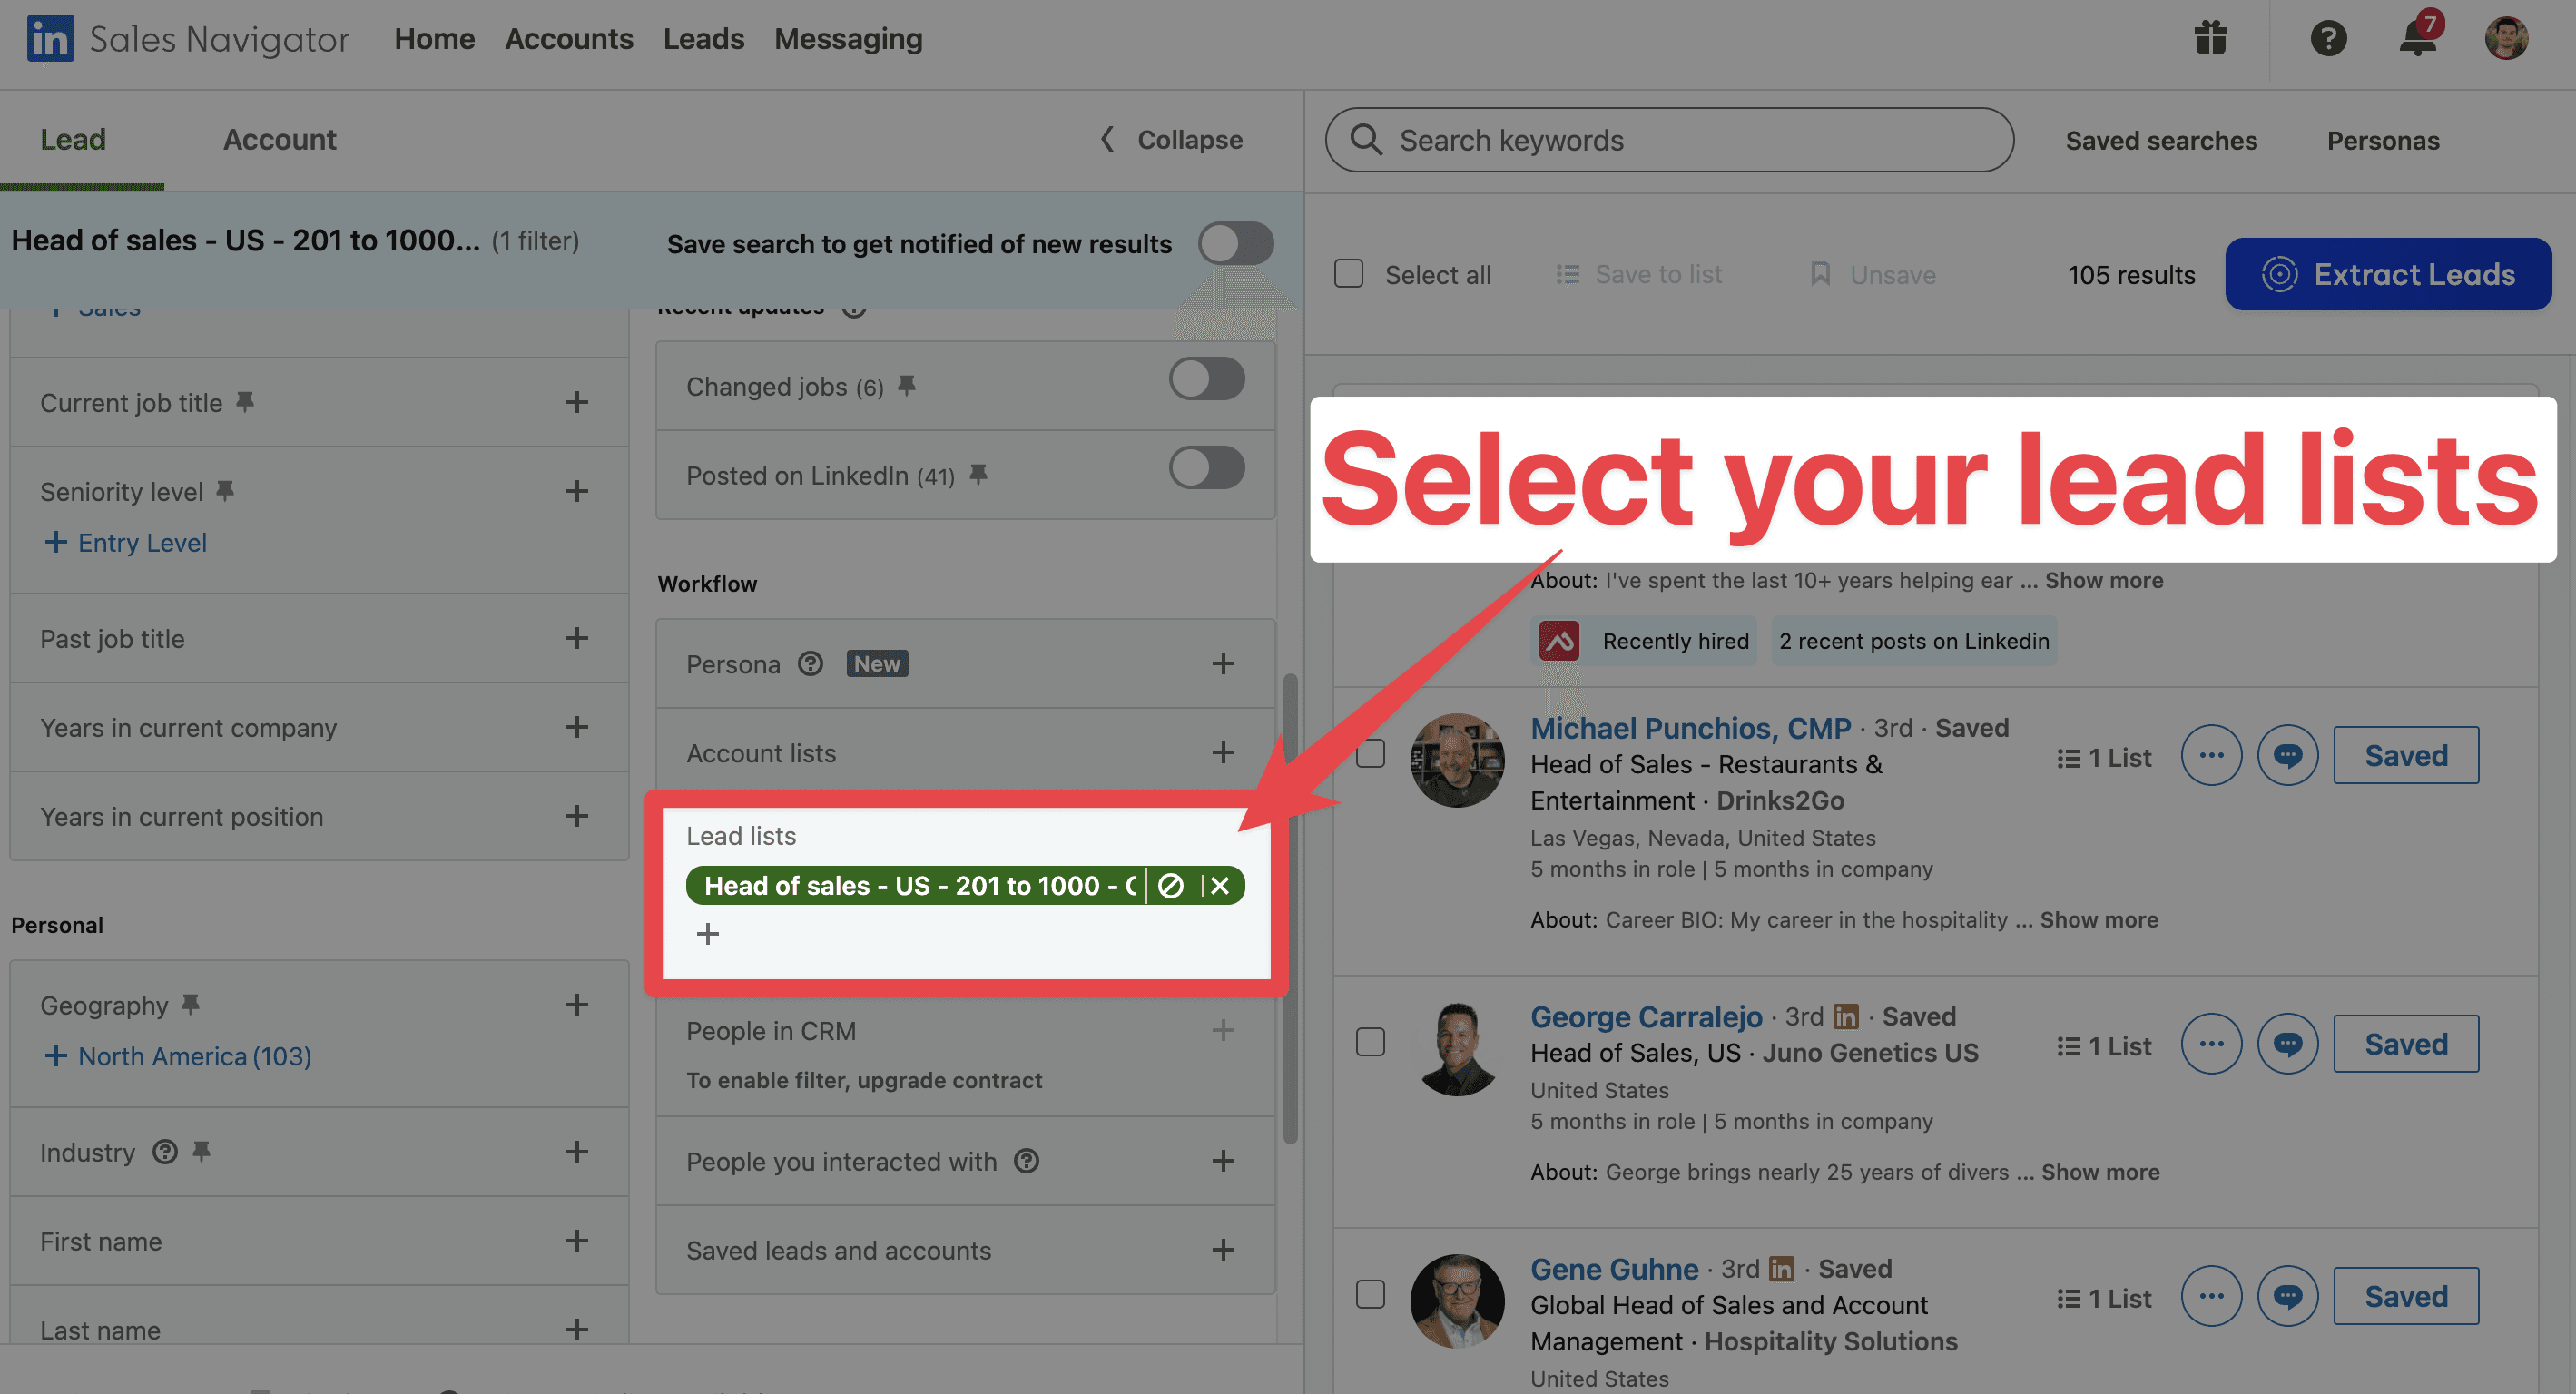
Step 3: Select your target on LinkedIn Sales Navigator
Go to LinkedIn Sales Navigator.
Select a a list in the "lead lists" filter.
Then, use filters to find your ideal leads (like job title, company size, or location). Like decision makers for example.
Finally, click “Extract leads” using the GiveMeLeads extension or paste the search URL on the platform.

🎥 If you're not sure how to use LinkedIn Sales Navigator to find qualified leads, you can check this video:
Step 4: Launch your export
You target is set up. Now it's time to export your leads.
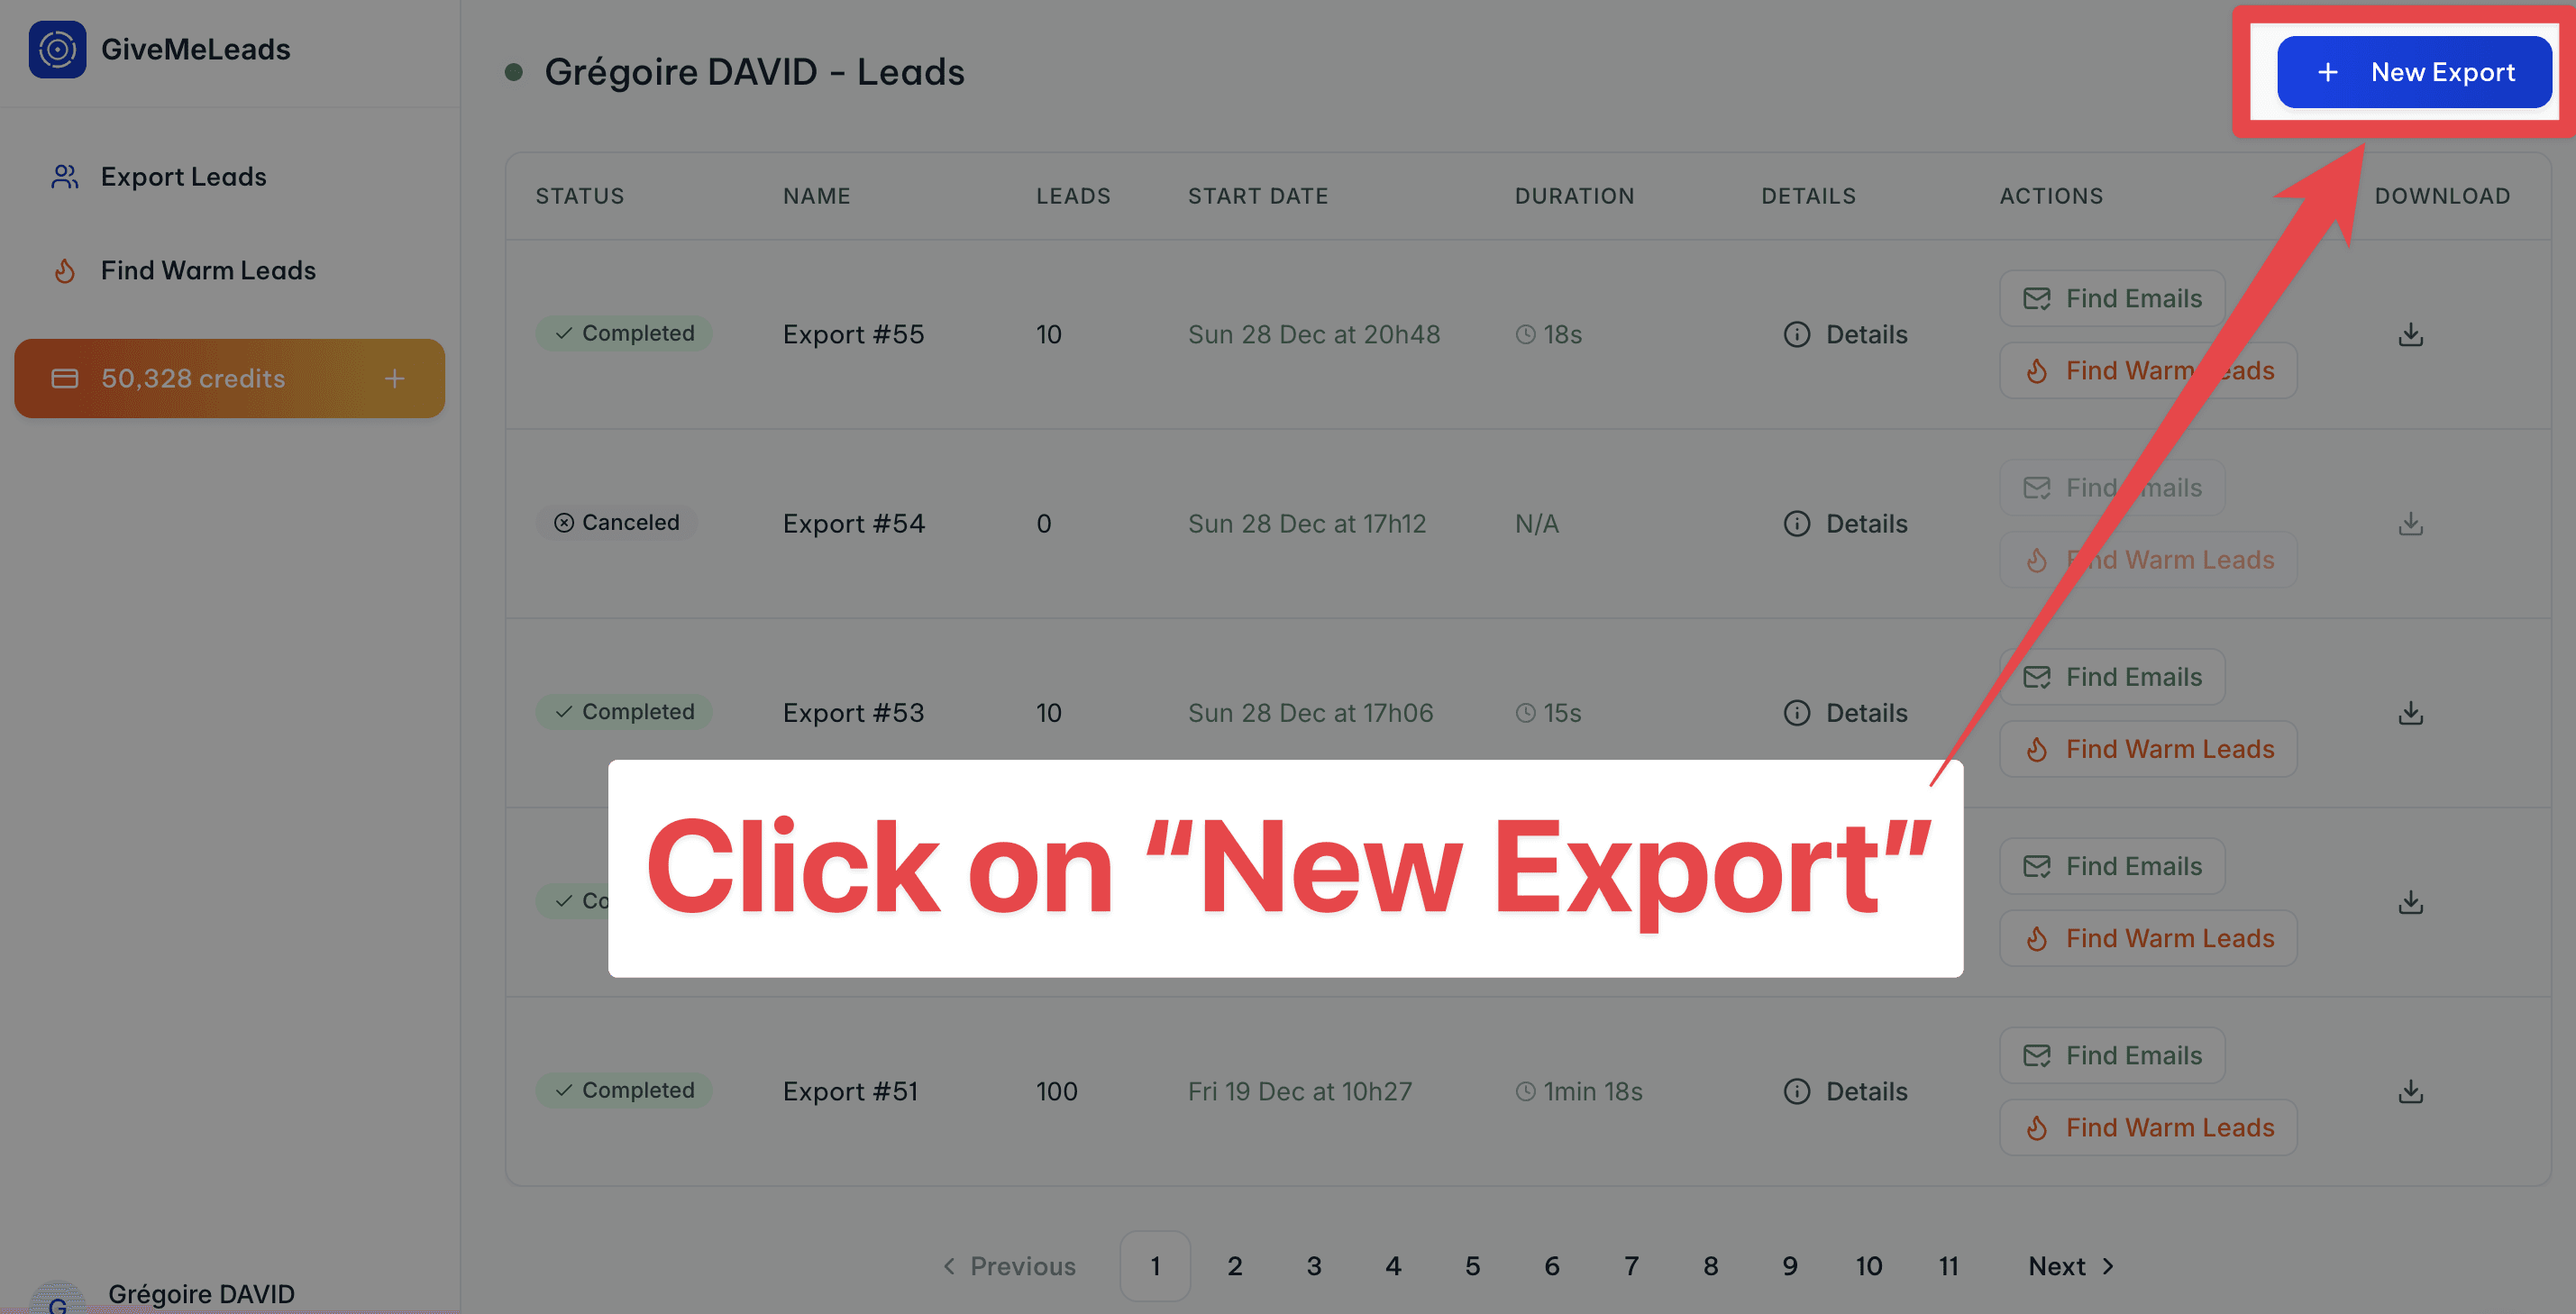
For that, click on "New Export".

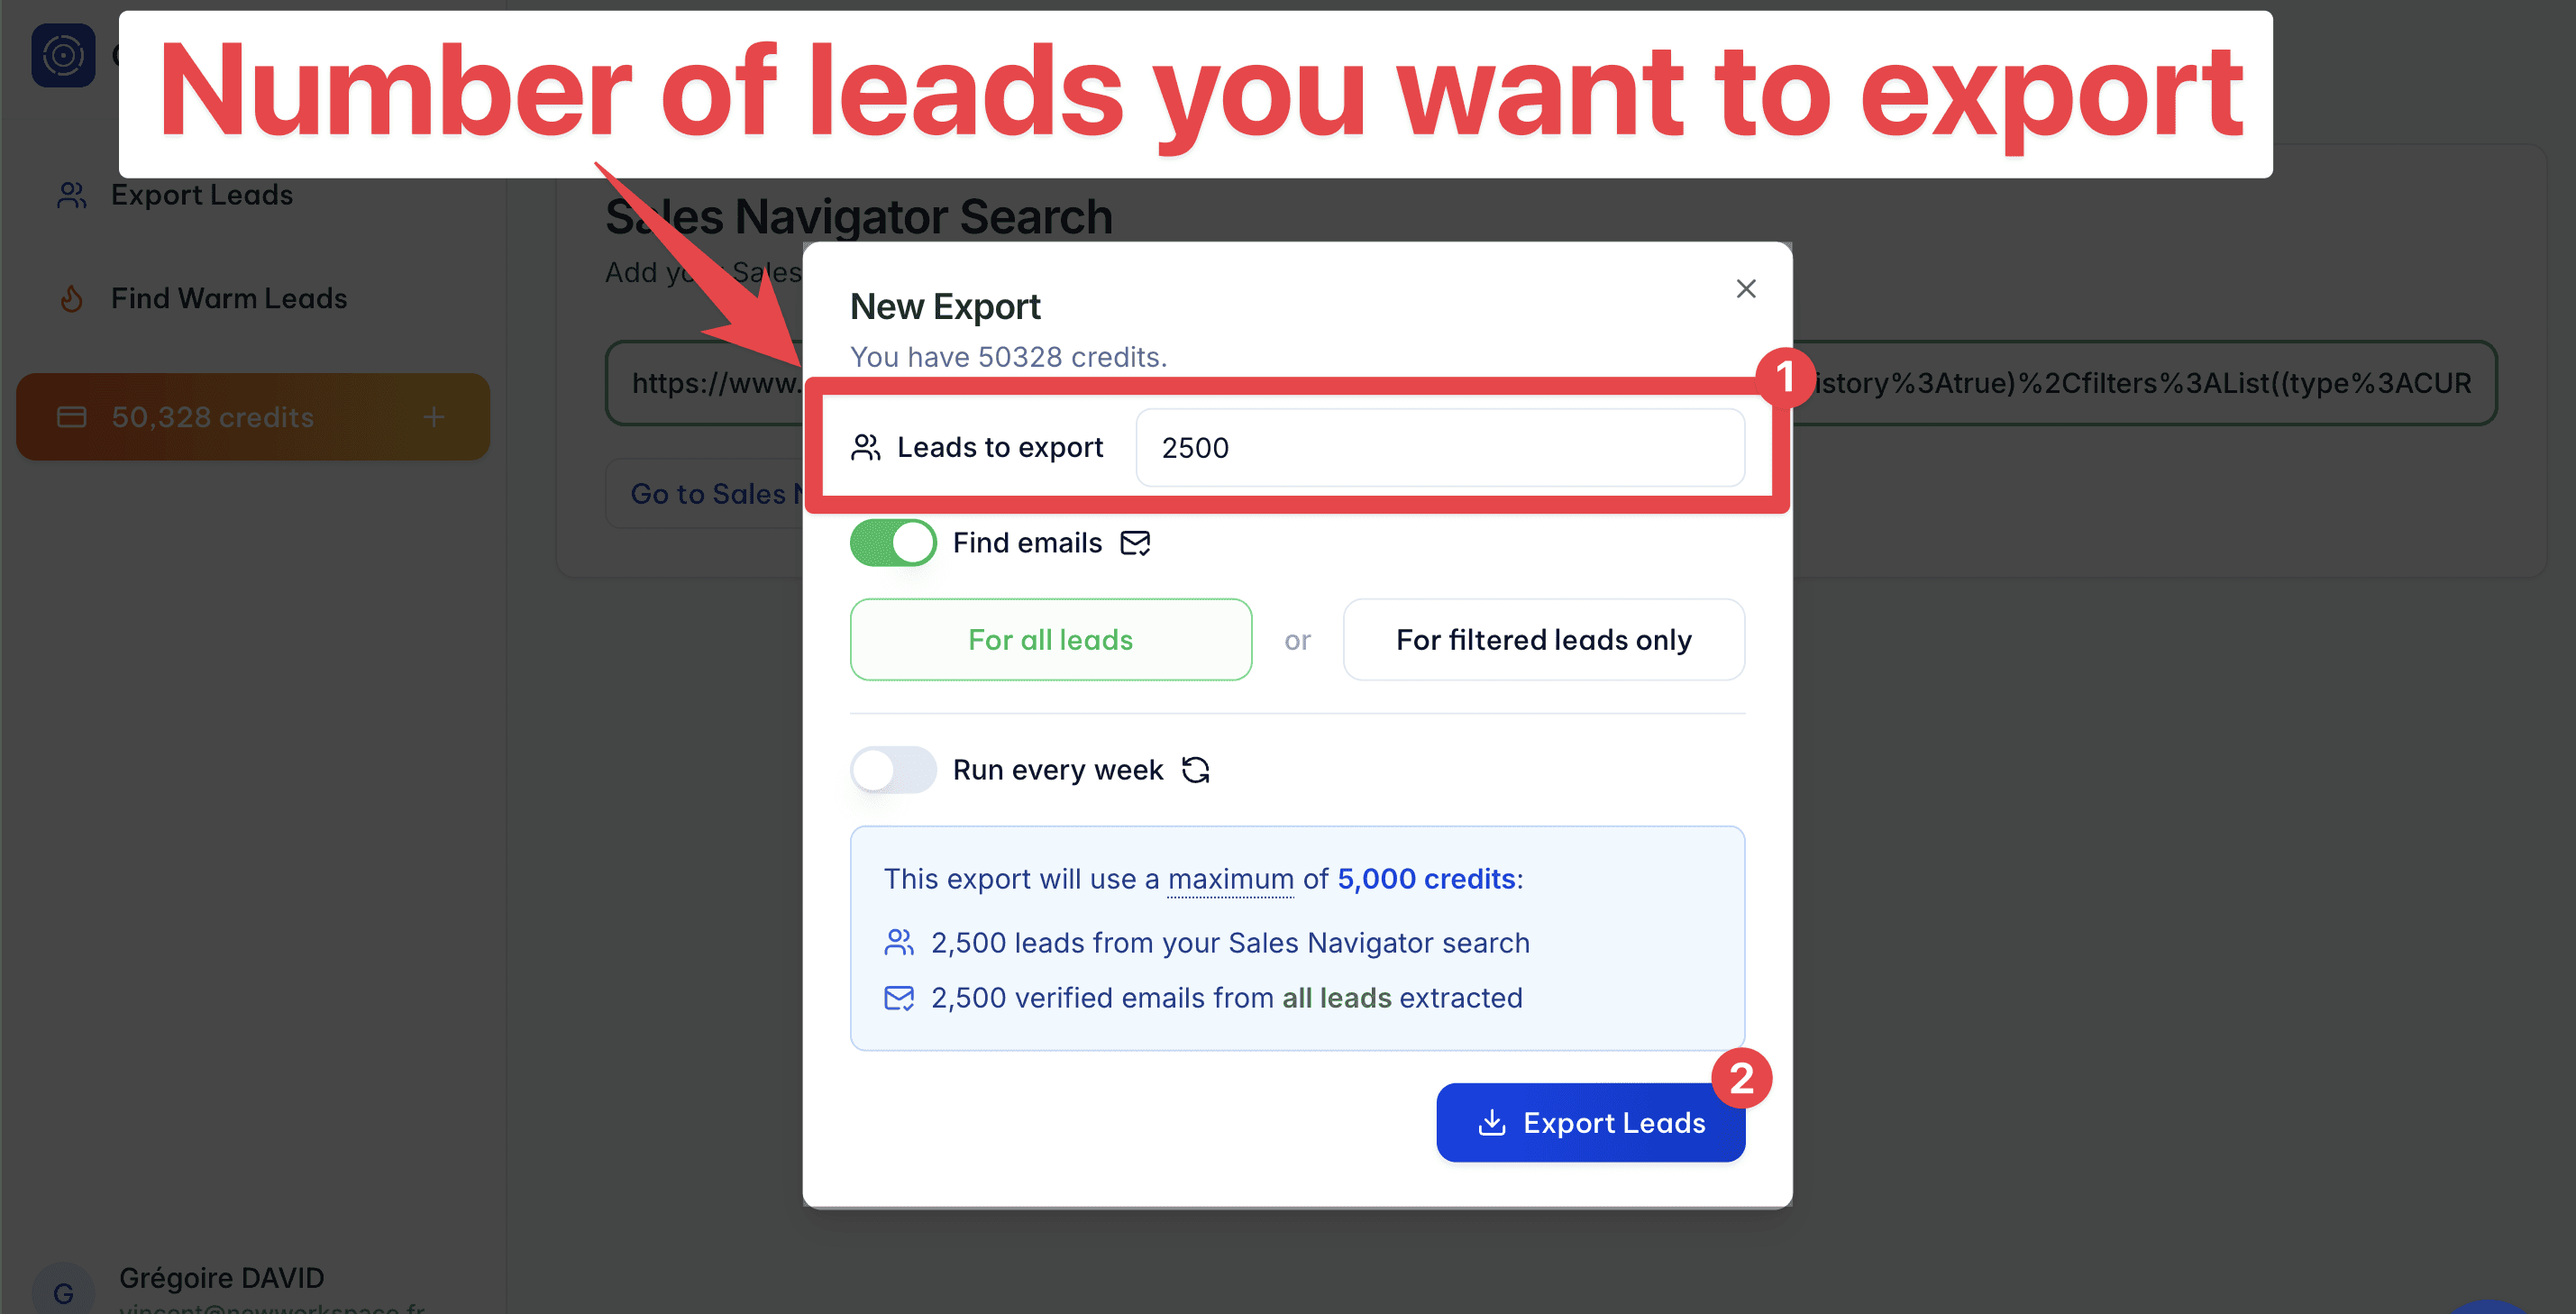
You will get a pop-up where you can select:
The number of leads you want to export
If you want to get the verified emails (of all leads or filtered leads only)
If you want to schedule this export on a weekly basis.
Then click on "Export Leads".

Step 5: Schedule Your Leads Export (Optional)
GiveMeLeads lets you schedule lead exports. Pick the day you want, and you’ll receive fresh leads weekly.
Once set up, you'll get a fresh list of leads every week — automatically.

Each lead is unique, and the system ensures there are no duplicates. This saves you time and keeps your CRM clean, so you can focus on outreach, not data cleaning.
Then, you’ll automatically receive new leads every week — no manual work needed.
You can focus 100% on what really matters: sending emails, starting LinkedIn conversations, and booking meetings.

💡 Pro tip: With scheduled exports, you can easily build lead files with more than 2,500 fresh, qualified contacts delivered straight to your inbox every week.
Step 6: Download your leads file
When your export is finished, you’ll receive an email with a download link.

You can also download your file directly by clicking the "Download" button in your dashboard. You’ll see two options.

"Open in Sheets"
This gives you a simple version of your lead list.
You have:
Source (Sales Navigator, 1st-degree, profile viewers…)
First Name
Last Name
Profile picture
Company name
Job title
Headline
LinkedIn URL
Email
It doesn’t include all the data, but it’s perfect if you just want to import leads into your CRM or a B2B outreach tool like Lemlist or Expandi.

"Download CSV"
This gives you the full file with all available data. For each lead, you’ll see extra info like:
Whether they have LinkedIn Premium
Their total years of experience
Company details like size, industry, and location
Etc
Here's all the informations you can have:
filters | source | source_info | first_name | last_name | linkedin_url | linkedin_id | email_status | job_title | location | profile_picture_url | recent_posts_count | connection_degree | is_premium | is_open | headline | summary | current_companies_count | company_name | company_linkedin_id | company_website | company_location | company_industry | company_employee_count | company_employee_count_range | company_type | company_year_founded | company_specialties | company_description | duration_in_company | duration_in_role | |
|---|---|---|---|---|---|---|---|---|---|---|---|---|---|---|---|---|---|---|---|---|---|---|---|---|---|---|---|---|---|---|---|
VALID | Sales Navigator | John | Smith | ACwAAAEXAMPLE1 | Verified | CEO | New York, United States | 2 | FIRST_DEGREE | TRUE | TRUE | Helping SaaS startups scale faster | CEO at NovaTech | Experienced CEO passionate about B2B SaaS, growth marketing, and building winning sales teams. | 1 | NovaTech | 123456 | New York, United States | Information Technology | 45 | 11-50 | PRIVATELY_HELD | 2015 | B2B SaaS;Sales Automation;CRM Tools | NovaTech builds modern tools to help sales teams close more deals, faster. | 36 months | 36 months | |||||
VALID | Sales Navigator | Emily | Johnson | ACwAAAEXAMPLE2 | Verified | CMO | Chicago, Illinois, United States | 3 | SECOND_DEGREE | TRUE | FALSE | Marketing Leader at BrightWave | Helping brands grow with storytelling | I lead the marketing team at BrightWave, combining creative storytelling with strategy. | 1 | BrightWave | 654321 | Chicago, Illinois, United States | Marketing and Advertising | 85 | 51-100 | PRIVATELY_HELD | 2012 | Brand Strategy;Content Marketing;Digital Ads | BrightWave helps businesses shine with strategic marketing and bold storytelling. | 60 months | 48 months |
💡 Pro tip: Don’t forget to scroll horizontally — there's a lot of valuable data in your lead file, including job titles, company size, verified emails, and even intent signals.
On top of that, GiveMeLeads automatically cleans your data:
Fixes capital letters in names and job titles
Removes emojis from job titles
Removes legal suffixes in company names (like LLC, GmbH, etc.)
Field | Before | After |
|---|---|---|
First Name | john | John |
Job Title | 🚀 CEO & Founder | CEO & Founder |
Company Name | Stripe GmbH | Stripe |

GiveMeLeads also checks if each lead matches your LinkedIn Sales Navigator filters.
If a lead doesn’t fit — for example, they have:
An invalid job title
Invalid location
Wrong company size work
Etc
We tag them in the column "filters" with the reason they’re invalid (like “Invalid job title” or “Wrong company size”).
That way, you keep full control of your data and don’t waste time guessing why a lead doesn’t match your targeting.

🎥 If you want to see how to extract your leads with GiveMeLeads and their verified emails, you can check this video:

Conclusion
To sum up how to create the perfect leads list on LinkedIn Sales Navigator:
Start by defining your ideal customer profile
Use filters to find matching leads
Save and organize your leads into lists
Export your list with GiveMeLeads
Find emails and import them into your CRM
That’s how you build a lead list that actually converts.
FAQ
How can I create a leads list on LinkedIn Sales Navigator?
Use filters to find your ideal customers, then save them to a custom list.
Can I export my lead lists from Sales Navigator?
Not directly, but you can use tools like GiveMeLeads to do it.
How many leads can I Save in LinkedIn Sales Navigator?
You can save up to 10,000 leads in Sales Navigator.

